Editor Note: We highly recommend that you implement the different ideas in this blog post through AB testing. By doing that, you will figure out which of these ideas works for your website visitors and which don’t. Download Invesp’s “The Essentials of Multivariate & AB Testing” now to start your testing program on the right foot.
When done right, split testing can help you capture more leads, get more visitors and increase sales.
When done wrong, it can cost you time, money and your search engine rankings.
Split testing is confusing for search engine spiders. In any successful A/B test, you might end up making dozens of page variations. Which of these pages do search engines index? Which do they rank for your target term?
This confusion can easily cost you rankings and search engine traffic.
In this post, I’m going to show you how you can split test effectively without harming your site’s SEO.
How Split Testing Affects SEO
Let’s say that Google’s bots land on your site and start indexing its pages.
After it’s done indexing, the Googlebot beams the data to Google. Google now runs its algorithm to determine where to rank your site’s indexed pages.
However, while going through this exercise, Google notices a problem: multiple pages on your site seem to have the same content with minor differences.
Some of these differences are in the page copy, some in design, and some in the use of images.
Their URLs, on the other hand, all look the same – [YourSite.com/your-page.html].
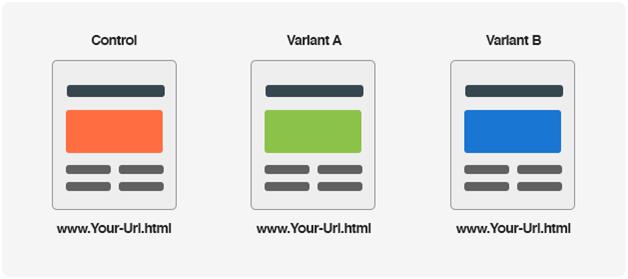
Google is obviously confused as to which page it should rank in the SERPs. Should it consider version A as the original page, version B or version C?
Even worse, Google might construe the similar pages as duplicate content and penalize you in the SERPs.
This is how split testing affects your SEO. It confuses search engine bots and can trigger duplicate content warnings.
Essentially, you need to SEO-optimize your split tests for two reasons:
- Avoiding duplicate content penalties: Following the Panda algorithm update, Google has started heavily penalizing sites with duplicate content. Since most page variations in a split test have only minor differences (such as an image or a headline) compared to the control, it can trigger a duplicate content warning, which can tank your rankings.
- Avoiding ranking confusion: If you have two similar versions of a page, it can confuse Google as to which page it should rank in its SERPs. It might end up choosing either of the two pages arbitrarily. Depending on how long you run the test, this can undermine your SEO efforts. The SEO term for this is “keyword cannibalization”.
Fortunately, there are easy ways to set this right.
What You Should Know Before SEO-Optimizing Your Tests
Before you invest in SEO-optimization for all your tests, there are two things you should know:
1. Not every test needs to be SEO-optimized
Landing pages, email newsletters, dynamically generated pages – essentially, any page that isn’t going to receive much search engine traffic can be safely tested without bother about its SEO.
The reason is simple enough: Google will almost never see these pages or show them up in the SERPs. The traffic they receive from organic results is going to nearly non-existent. Bothering with optimizing their variants is effectively meaningless.
For example, suppose you have a button leading to an opt-in form at the bottom of your blog posts, like this:
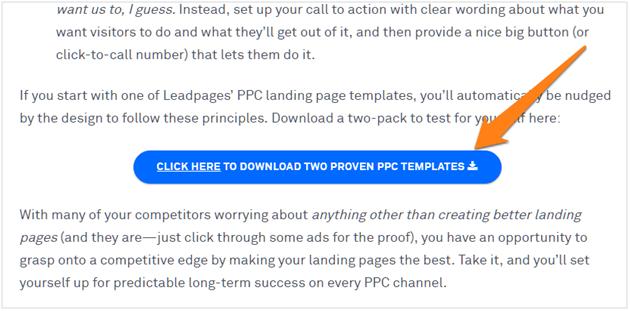
Clicking this button takes you to an opt-in form:
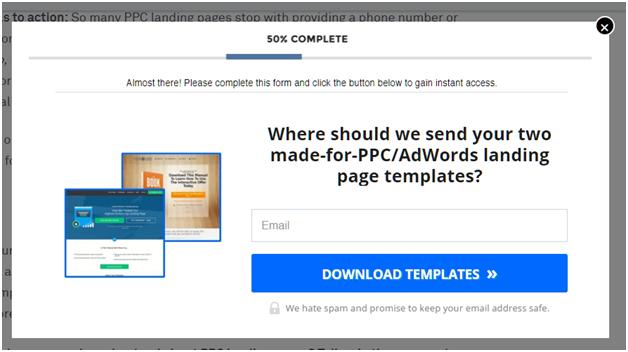
Once you fill the form, you’re redirected to a “Thank You” landing page:
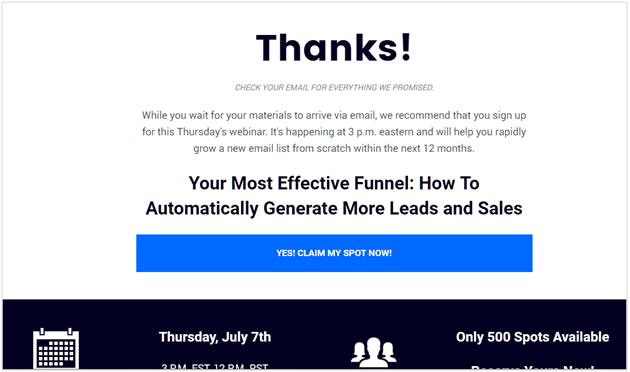
Since this landing page will only be seen by people who enter their information in the opt-in form, you don’t need to bother with its SEO at all.
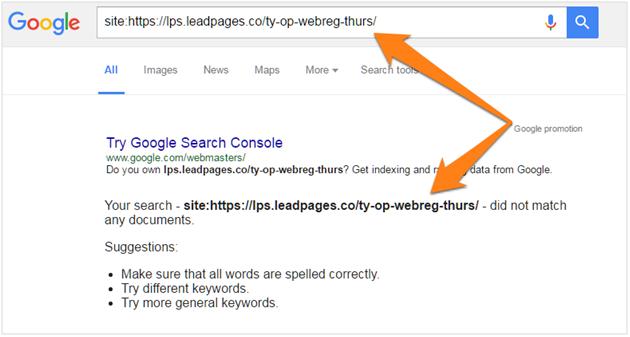
In the above example from LeadPages.net, the URL for the Thank You page isn’t even indexed in Google:
Ask yourself these two questions before you start the optimization process for a page:
- Does this page need to be indexed by search engines?
- Will this page receive a significant share of traffic from search engines?
Invest in SEO-optimization only if the answer to both these questions is true.
Here’s a quick way to figure out which pages you need to SEO-optimize before testing.
Log into Google Analytics, then go to Behavior -> Site Content -> All Pages. This will show you a list of all the pages on your site:
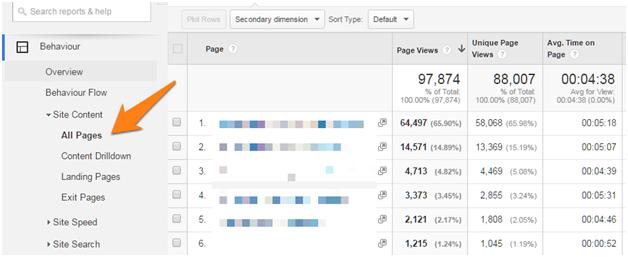
Your objective here is to find pages with a lot of search engine traffic, but little referral, direct or social media traffic.
To do this, select “Acquisition -> Source” under ‘Secondary Dimension’:
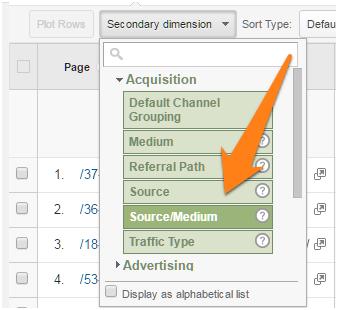
This will show you a list of your best performing pages and their traffic sources.
In this list, find the page that you want to optimize and click on it. On this screen, sort the results by “Entrances”.
Google Analytics will show you what traffic source a majority of the page’s visitors came from.
In this example, only 1.31% of all traffic came from Google. Nearly all of it came from either Reddit or Facebook:
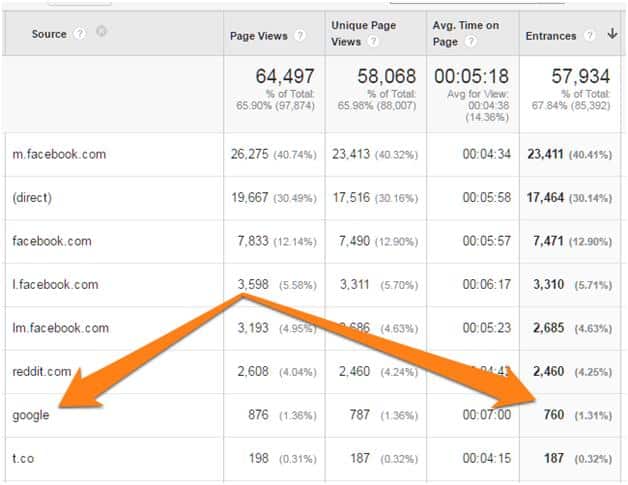
With so little search traffic, there is no real reason for me to bother with the SEO-optimization for this page. I have little to lose from any negative impact on this page’s rankings anyway.
Follow a similar process for pages you want to test. If your data shows that the page isn’t getting much traffic from Google, don’t worry about optimizing your tests for search.
2. For most pages, conversions are more important than SEO
You might take all the precautions mentioned above, but still see a slight negative impact on your rankings.
In nearly every case, this impact will be short-term. After all, you’ve only made changes at the page-level; the domain-level metrics are still the same. Once Google picks this up, it will push your rankings back up.
More importantly, an increase in conversions can easily make up for a drop in search engine traffic.
For example, suppose you were getting 1,000 visitors/month from a keyword. Your original page – version A – had a conversion rate of 1% for a $500 product. Your actual revenues for this keyword, thus, were $5,000/month.
During testing, you saw a drop in rankings that led to the page receiving just 500 visitors/month (highly unlikely, but it can happen).
However, the changes you made to the page resulted in a conversion rate of 2.5%. Thanks to the higher conversion rate, your revenues for the keyword were now $6,250, even with lower traffic.
This is why I recommend focusing more on conversions, less on SEO during the testing process.
How to Split Test Safely
Setting up a safe and effective split test requires telling Google about your original page and de-indexing your test pages.
Follow these steps to learn how to do it:
1. Help Google identify your original pages
In 2012, the Internet Engineering Task Force (IETF) released the “canonical link element”.
This is a simple HTML element that helps search engine spiders identify the “canonical” or “preferred” version of a page.
This element was adopted widely by search engines to help combat the duplicate content issue. The idea is simple enough: by adding this tag to a page, you can tell Google the location of the “original” version of the page.
Google will then ignore any other page variations, saving you from duplicate content issues.
As you might have guessed, the canonical tag is extremely useful when split-testing.
Essentially, you’ll add a canonical reference to your test pages pointing to your control. This will help Google identify your original page.
Here’s how to use this tag:
Open your test page in a HTML editor.
Next, add this bit of code to between the <head></head> section of your test page:
<link rel=”canonical” href=”http://YourSite.com/YourURL.html”>
Here, [YourURL.html] should point to the exact URL of your original page.
Next, add this bit of code to between the <head></head> section of your test page:
<link rel=”canonical” href=”http://YourSite.com/YourURL.html”>
Here, [YourURL.html] should point to the exact URL of your original page.
Here’s an example from the KISSMetrics home page:

Google can then refer to this tag to figure out the original version of a page.
2. Make sure that Google doesn’t index your test pages
The easiest way to avoid confusing search engine spiders is to make sure that they don’t even index your test pages.
There are two ways to do this:
A. Add a “No Index” tag to test pages
The “No Index” meta tag goes in the <head> of a HTML page and tells search engine spiders not to index the page.
To use this tag, open your test page in a text editor. Then, add the following code in between the <head></head> section of the page:
<meta name=”robots” content=”noindex” />
This will ensure that search engines don’t index – and rank – your test pages.
If you want to stop only Google from indexing your page, use this code instead:
<meta name=”googlebot” content=”noindex” />
B. Use robots.txt
The Robots.txt is a simple text file that instructs search engine spiders which pages to index, which pages to ignore.
It looks something like this:
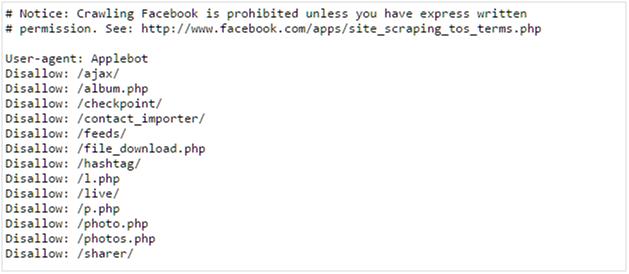
That, by the way, is Facebook’s Robots.txt file.
You can use this file to tell search engine spiders not to index your text pages.
To do this, first find your robots.txt file. For any site, this file is located here:
http://SiteName.com/robots.txt
All robots.txt files are publicly viewable. For instance, this is Apple’s robots.txt and this is Google’s.
Next, hit CTRL+S to save this as a text file. Open it in a text editor and add the following code to this page:
User-agent: Googlebot
Disallow: /Directory/Your-Test-Page.html
Here, [/Directory/Your-Test-Page.html] is the path of your testing page.
This will stop Google from indexing the specified URL.
Similarly, you can stop Bing, Baidu and other search engines from indexing the page by using the following User-agent codes:
- Baidu: Baiduspider
- Apple: Applebot
- Bing: Bingbot
- Naver: Naverbot
- Yandex: Yandex
- Yahoo: Slurp
You can also edit the robots.txt file through Google Webmaster Tools. Go to Crawl -> robots.txt Tester.
Add your edits here and click “Submit”.
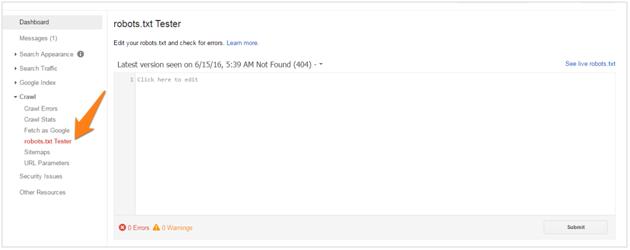
I don’t recommend this method since your robots.txt file is publicly viewable. Anyone – including your competitors – can look up this file to see which pages you’re testing.
Since most businesses only test traffic heavy, money pages, competitors can use this information to figure out which of your pages convert the best and copy them.
Plus, the robots.txt method isn’t foolproof. Spiders sometimes ignore the robots.txt instructions. Additionally, maintaining a long list of URLs along with their user agents manually can get very tiresome.
Control indexed pages through Webmaster Tools
Sometimes, even taking all the measures in the world doesn’t stop search engines from indexing your pages. This usually happens when a search engine spiders ignores the no-index tag or if there are external links pointing to your text page.
In such cases, you can temporarily de-index pages through the Google Webmaster Tools.
Here’s how:
Log into Google Search Console and open your site.
Now click on “Google Index” -> “Remove URLs” in the left menu:
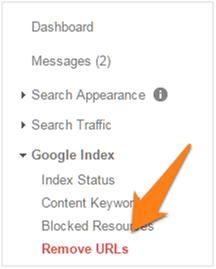
Click on “Temporarily Hide”.

Enter your exact URL and click Continue.
On the next screen, select the default options, then click on “Submit Request”.

You can also check whether Google has indexed your pages by searching for the following:
Site:YourWebsite.com/Your-Test-URL.html
3. Avoid cloaking errors
Cloaking is a technique through which you can show different versions of a page depending on the source of the traffic.
With cloaking, you can show version A of a page to a visitor coming in from Google, and version B for a visitor coming from Facebook.
In theory, this sounds like the perfect solution to prevent Google from accidentally indexing your test pages.
Unfortunately, cloaking has long been abused by spammers for misleading search engines. This is why all search engines – from Google to Bing – heavily penalize sites with even the slightest hint of cloaking.
Some split testing tools inadvertently cause such cloaking errors by showing different pages to Google bots and humans. These tools track the traffic source (called “user_agent”) and show the original version to Google and version B to actual human visitors.
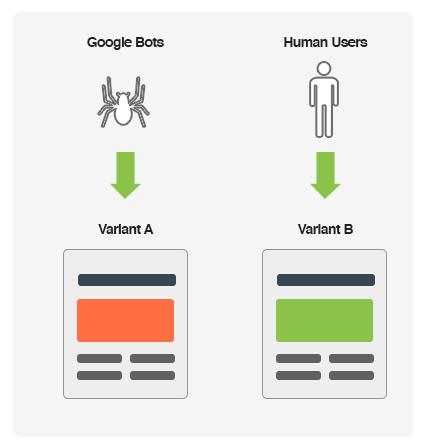
Google explicitly states that it wants to see the exact same page a real user sees, not something optimized for its algorithm. Serving different pages based on user_agent tracking, therefore, might be seen as an attempt to deceive Google.
Check whether your testing tool does user_agent tracking for its running its tests. If it does, it’s a good idea to switch to a different testing tool.
4. Run the test only as long as necessary
Straight from Google’s mouth:
“Once you’ve concluded the test, you should update your site with the desired content variation(s) and remove all elements of the test as soon as possible…If we discover a site running an experiment for an unnecessarily long time, we may interpret this as an attempt to deceive search engines and take action accordingly.”
Meaning you should run your test only as long as necessary to get the desired results. Running a test too long – even with all the above precautions – may be seen by Google as an attempt to deceive it.
Which, of course, is disaster for your rankings.
Your testing tool should be able to tell you when it has enough data to draw accurate conclusions (called “statistical confidence”). Once you reach a high degree of confidence, it makes no sense to continue diverting traffic to your test pages.
After wrapping up the test:
- If the control lost: Update the control with newer graphics/copy/design.
- If the control won: Keep control as is and delete all test pages.
Over to You
Split testing is an incredibly powerful tactic for improving revenues, leads and page views without additional traffic.
However, a poorly conducted split test can trigger duplicate content warnings and confuse Google about the identity of your original page. This can play havoc with your site’s SEO and search engine rankings.
Thankfully, these SEO issues are easy to avoid by prioritizing which pages to test and using canonical tags, no-index meta tags and capable testing software.
Editor Note: We highly recommend that you implement the different ideas in this blog post through AB testing. By doing that, you will figure out which of these ideas works for your website visitors and which don’t. Download Invesp’s “The Essentials of Multivariate & AB Testing” now to start your testing program on the right foot.


